
Inicio de sesión único
-
- ¿Qué es el inicio de sesión único?
- How do I set up single sign-on (SSO) with HelpDesk ?
- How do I configure my HelpDesk account for SSO?
- ¿Cómo habilito el SSO para mis usuarios?
- ¿Es posible eliminar un perfil SSO?
- ¿Cómo puedo desactivar SSO para un usuario?
- Can I configure my choice of identity provider for SSO?
Single Sign-on (SSO) is a one-step user authentication process. If you are the admin of a HelpDesk account, you can set up SSO with the identity providers (IdP) of your choice. Your technicians can access HelpDesk using the IdP credentials without another password to manage.
Admin of a HelpDesk account can configure SSO to access HelpDesk by signing in to a central identity provider. To set up SSO, you need to first configure your identity provider and then configure your HelpDesk account.
To configure SSO for your HelpDesk account,
- Login to HelpDesk via web browser.
- Click user icon the displayed on the top-right corner and click 'My Account'.
- Haga clic en "Inicio de sesión único".
- Introduzca un nombre para su perfil SSO.
-
Enter the URLs and add the X.509 certificate received from your IdP.
Note: X.509 certificate should only be in .pem or .cer format.
-
Haga clic en "Configurar inicio de sesión único".
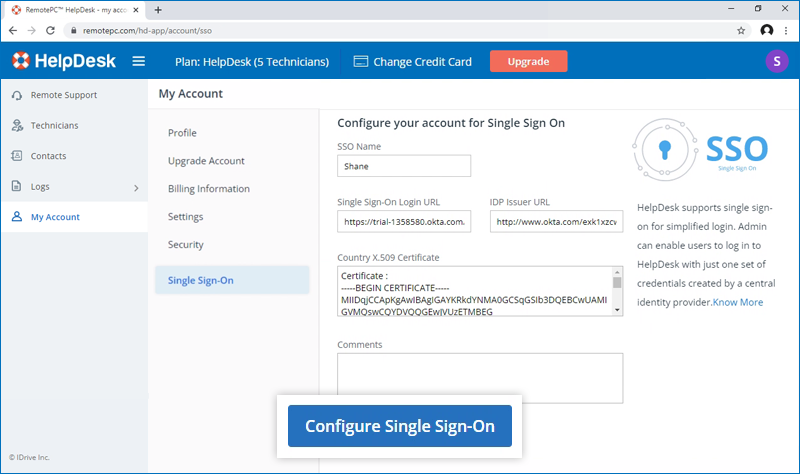
Recibirá un correo electrónico cuando se active el SSO.
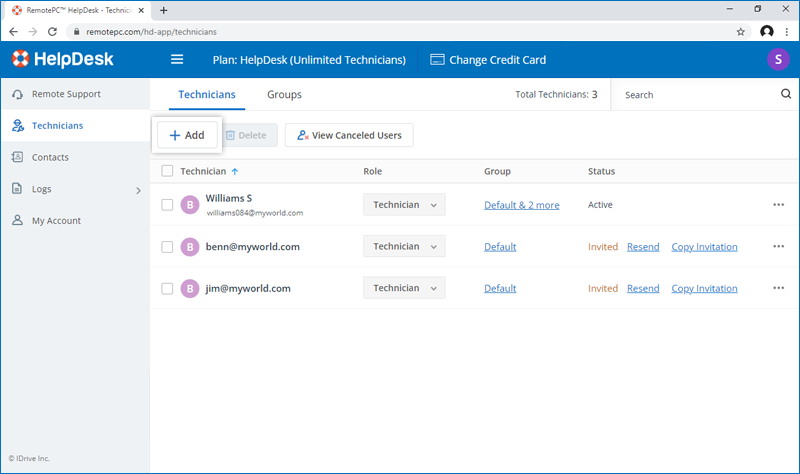
Admin of HelpDesk accounts can either select SSO for login while inviting technicians to create an account or enable SSO for existing technicians.
To invite technicians to use SSO,
- Log in to HelpDesk via web browser.
-
Go to the 'Technicians' tab and click 'Add'.
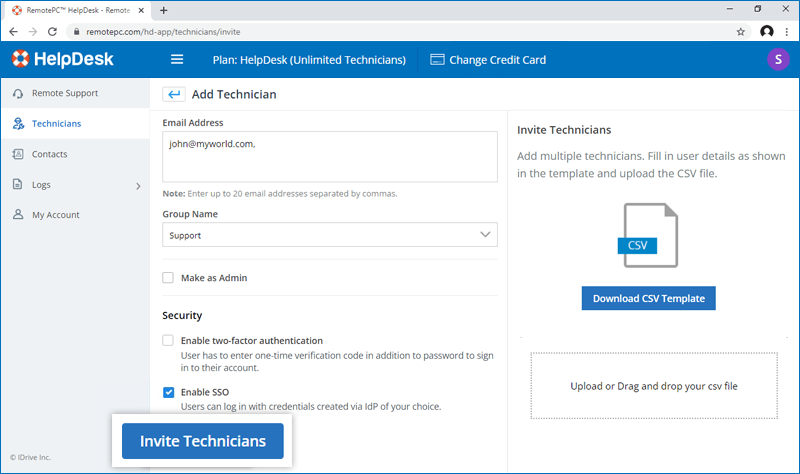
- Enter the email address in the 'Email Address' field.
- Select group and other preferences for the technician.
-
Seleccione "Activar SSO".
Note: If you select the checkbox, technicians won't have to set a password for their account.
-
Click 'Invite Users'.
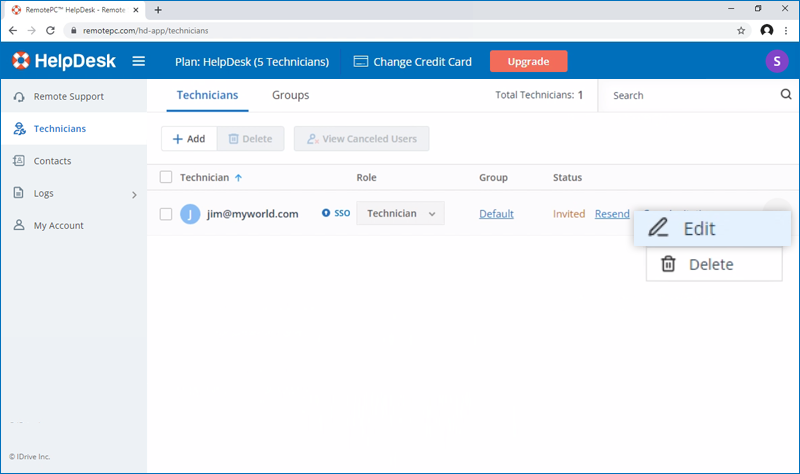
To enable SSO for existing technicians,
- Login to HelpDesk via web browser and go to the 'Technicians' tab.
-
Hover on the technician you want to edit and click
 and click ‘Edit’.
-
Seleccione "Activar SSO".
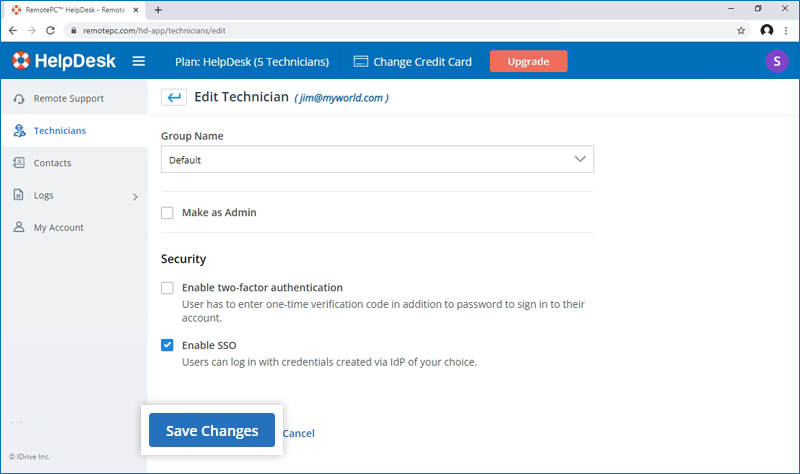
- Haga clic en "Guardar cambios".
Sí, los administradores pueden eliminar un perfil SSO de su cuenta.
Para eliminar el perfil SSO,
- Login to HelpDesk via web browser.
- Click the user icon displayed on the top-right corner and click 'My Account'.
- Haga clic en "Inicio de sesión único".
- Haga clic en
 correspondiente al perfil SSO que desea eliminar.
 -
Click'Delete' in the confirmation popup to remove the SSO profile.
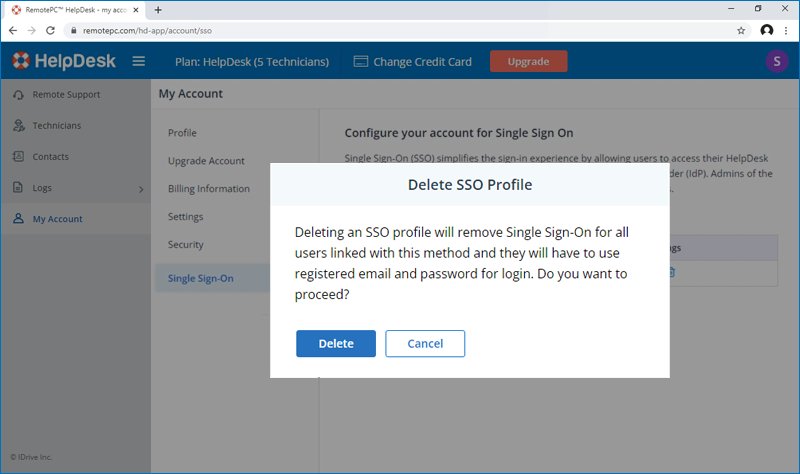
Deleting the SSO profile will remove Single Sign-On for all technicians linked with this profile and they will have to use their registered email and password for login.
To disable SSO for a technician,
- Login to HelpDesk via web browser and go to the 'Technicians' tab.
- Haga clic en on the technician you want to disable SSO and click ‘Edit’.
- Desmarque la casilla "Activar SSO".
- Haz clic en "Guardar".
Si desactiva el inicio de sesión único para un usuario, éste deberá establecer una nueva contraseña para su cuenta. Una vez hecho esto, el usuario deberá utilizar su dirección de correo electrónico y su nueva contraseña para iniciar sesión.
Yes, you can configure your choice of identity provider for SSO along with a set of parameters as described below:
- HelpDesk uses SAML2 with the HTTP Redirect binding for HelpDesk to IdP and expects the HTTP Post binding for IdP to HelpDesk.
-
Al configurar con SAML, utilice las siguientes URL y guarde los cambios.
- Audience URL (SP Entity ID):
https://sso.remotepc.com/helpdesk-api/user/sso/metadata - Single sign on URL:
https://sso.remotepc.com/helpdesk-api/user/sso/process
- Audience URL (SP Entity ID):
- Su proveedor de identidad puede preguntarle si desea firmar la aserción SAML, la respuesta SAML, o ambas.